Excel VBA Tutorial Chapter 7: How to write a function
Goal of this chapter
In this chapter we will review the use of functions in Excel VBA. We will write a custom function, use that function in the Excel worksheet as a “User Defined Function” and also use the function in a subprocedure. The elements that will be discussed in this chapter are:
- Excel VBA functions
- Declare a function
- Excel user defined functions
- Call functions and subprocedures
- Use worksheet and workbook events
The chapter is written assuming you already understand the concepts discussed in the previous chapters of this tutorial. If you are new to Excel VBA and have not reviewed the preceding chapters, you might want to start at the beginning.
What is a function?
Together with subprocedures, functions are the basic building blocks of Excel VBA code. While a subprocedure executes an action, a function returns a value. Like a function in the Excel spreadsheet, you need to give input values to a function and the function will perform the predefined operations and return the result.
Declare a Function
A function is declared differently than a subprocedure. While to declare a subprocedure it was enough to just give it a name, for the function we need:
- Name of the function
- What are the input variables (called “arguments”)
- What data type are the arguments
- What data type is the result of the function
To illustrate how to declare a function let's continue with the example we used in Chapter 5, where we checked if certain colours belonged to the group of primary colours. We can formulate this as a function, where we have an input colour (e.g. “green”, data type String), an operation (check if green part of the primary colours) and a result (“Yes”, also data type String).
A function needs to be declared in a module, so open a new module if you don't have one open already. We will call the function “CheckIfPrimary” and use the Select… Case statement from Chapter 3.
Option Explicit
Option Base 1
Option Compare Text

Function CheckIfPrimary(InputColour As String) As String

    Select Case InputColour
        Case "red", "yellow", "blue"
            CheckIfPrimary = "Yes"
        Case Else
            CheckIfPrimary = "No"
    End Select

End Function
As I have opened a new module to write the function, I begin with the three option statements I put at the top of each module: Option Explicit, Option Base 1 and Option Compare Text. Since there are no arrays, Option Base 1 could have been left out, but I include it nevertheless as I might later add subprocedures or functions to the module that do include arrays.
The next line after the option statements declares the function. The available data types to declare a function and the arguments are the same as those listed in Chapter 2 in the section on how to declare a variable. Also, the scope of a function can be set similarly to that of a variable. By default a function available for use in all the sheets and modules of a workbook. This is the same as explicitly declaring the function as Public Function. When declared as Private Function the function can only be used within the same module.
A few last remarks on the basic form of a function. Firstly, the result of the function is assigned to the name of the function itself (here the command line CheckIfPrimary = "Yes"). Secondly, functions generally have one or more arguments (the inputs). If there is more than one, you can add each argument separated by a comma from the others and each can have its own data type. More by exception than rule, a function might not have any arguments at all. For example, the predefined NOW() function returns the system date and time and does not require any arguments.
User Defined Function
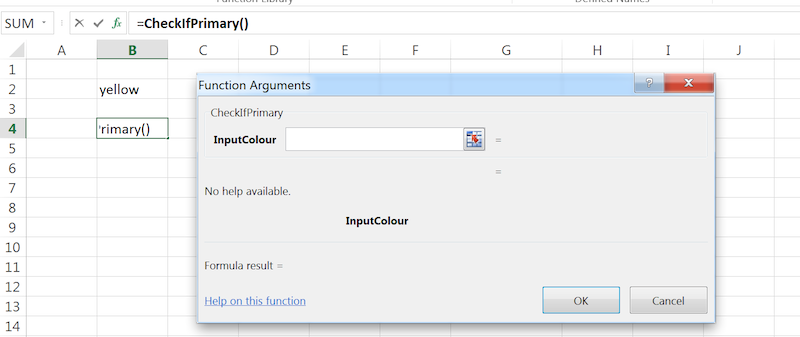
When adding formulas in the Excel sheets you can reference the functions you created yourself. Here we will use the function CheckIfPrimary() created in the previous section. Open an Excel spreadsheet and type “yellow” (without quotes) in cell B2. Select cell B4. To insert the user defined function you have the same options as any other function: you can either write it in the cell preceded by the “=” sign, or choose it in the formula menu. To do the latter, go to “Formulas -> Insert Function” and find the function under the User Defined category (make sure your function is not defined as Private otherwise this option will not show up). If you inserted the function throught the menu options you should see something similar to the following, depending on your Excel version:

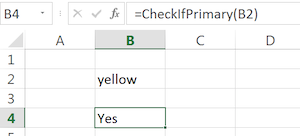
Choose cell B2 as the Function Argument, by either typing it directly into the box or by selecting it after clicking the button with a small picture of a sheet with a red arrow on the right of the box. Press “OK” and the result should be:

Indeed, the result of the function should be “Yes” since we defined primary colours to be “red”, “yellow”, or “blue”. You can try different values in cell B2 to see how the result in cell B4 changes. Anything else than the predefined values should return “No” in cell B4. The only exception is when you put one of the primary colours in cell B2 with one or more capital letters. The function will still return “Yes” in cell B4 as we used Option Compare Text at the module level.
Call functions and subprocedures
When you write a subprocedure you can use a function and vice versa. The name for this is to “call” a function or a subprocedure. This is very useful when the operations performed by the function or subprocedure are used repeatedly in different parts of your macro. Instead of reproducing several times a bit of code that performs a particular operation, it is more efficient to write the code once in a function or subprocedure and call it in the appropriate parts of your code.
The following figure shows a subprocedure that calls the function “CheckIfPrimary”:
Sub UseFunction()

  Dim Colour As String

  Colour = Range("B2")

  Range("B4") = CheckIfPrimary(Colour)

End Sub
When using it, first delete the contents of cell B4. Run the subprocedure by pressing F5 while having the cursor placed in the subprocedure, or run it pressing ALT+F8 for Windows or Option+F8 on Mac (and select from list) while in the Excel sheet. If you run into any issues, have a look at some of the most common issues I listed in Chapter 2.
If all works well you should see that B4 only changes when you run the subprocedure, while in the previous section (when using the function in the worksheet directly) the value in cell B4 was updated automatically after entering a new value into cell B2. Depending on the context this could be a desirable outcome or not, so we'll look at how to run the subprocedure automatically in the next section.
Use Worksheet events
If you would like the result in B4 to update automatically after changing cell B2 then one option is to use the event subprocedures that are predefined in the Excel workbook or worksheet objects. These events will run a subprocedure when triggered by a certain event in the worksheet or workbook. In our case we would like to run the UseFunction subprocedure whenever we change cell B2.
In the Project window of the VBA editor we need to open (double-click) the sheet in which we have cell B2 with the input value:

You see an empty workspace since we did not yet write any code specific to this worksheet. At the top of the empty workspace you can see two drop down boxes. The first has “(General)”, the second “(Declarations)”. The next steps are different for if you are using Excel for Windows or on a Mac. Some of the automation to create the worksheet event subprocedures are not available on Mac. However, you can just manually write the commands, so having to forgo some of the automation on Mac. For Windows, select in the first drop down box “Worksheet”. If you do this on a Mac it gives an error. For Windows, the second drop down box changes to “SelectionChange” and the VBA editor automatically populates the workspace with a Worksheet_SelectionChange subprocedure:

This is actually the subprocedure we want. If you need any other worksheet related event you would click the arrow next to the drop down box that has “SelectionChange” and select the event you are after. On Mac, you can manually type any worksheet event and from then on you will be able to use the drop down box as well. For example, writing the following code will make the drop down box on the right available to choose any other event (and then you could remove this code):
Private Sub Worksheet_Activate()

End Sub
In the Worksheet_SelectionChange subprocedure write “usefunction” in lower case. If recognised as the subprocedure we defined earlier on, the "U" and "F" should change to capital letters:

When you go back to the sheet now and start changing the value in B2 you will see that B4 will update automatically.
One note of caution when using worksheet events. It is quite easy to make infinite loops when you use events. If for example we use the Worksheet_SelectionChange event and the VBA subprocedure sets off another selection change on the worksheet then the code will keep executing indefinitely. In case that happens stop the code execution with CTRL+Break on Windows or Cmd+Option+Esc to force quit on Mac.
A different set of events are available when you open (double-click) “ThisWorkbook” in the Project window. Particularly subprocedures such as Workbook_Open or Workbook_BeforeClose are used often in case any operations need to be performed when a workbook is opened or closed. Also, if you are on Mac you can create subs with these names to make the drop down box of events on the right-hand side available.
Concluding remarks
Congratulations, you have made it to the end of the tutorial! I hope the tutorial has provided you with sufficient insight into the essential components of Excel VBA so you can build your own macros for your own specific requirements. Should there be any contents you missed in this tutorial please do not hesitate to let me know. Happy coding!